Showing posts with label plan. Show all posts
Showing posts with label plan. Show all posts
Monday, March 21, 2016

Saturday, February 20, 2016
Laptop table (wheely desk) plans
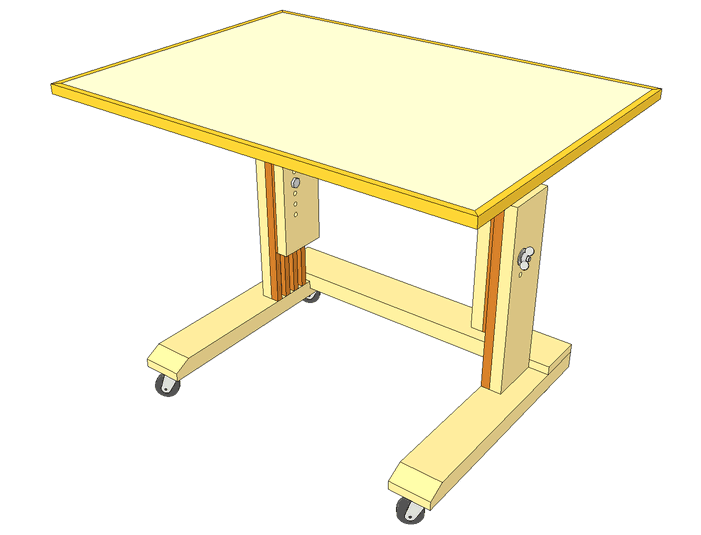 Horizontal parts of the legs: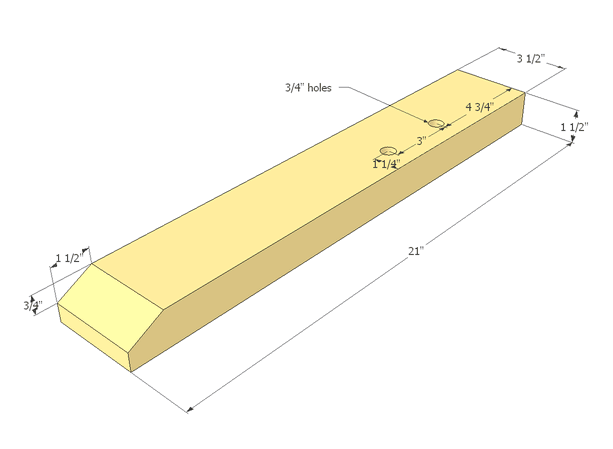 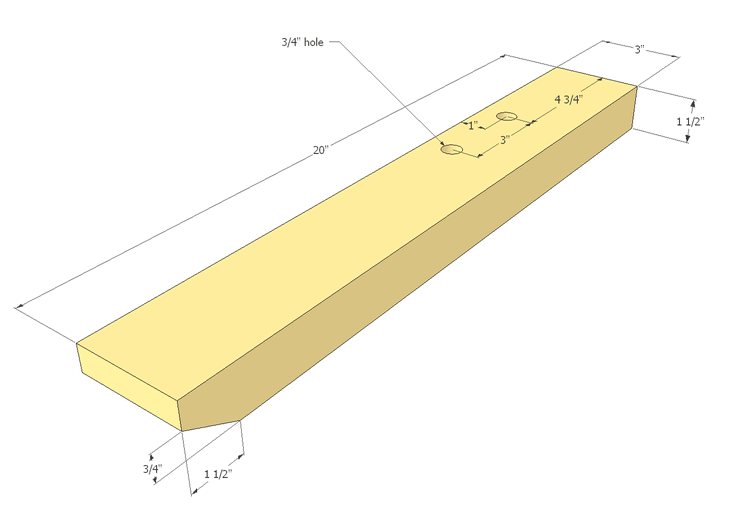 |
Friday, February 12, 2016
Tuesday, October 6, 2015

Thursday, September 10, 2015
Build Dave’s Two-Piece Armoire
Awhile back, I had a request for a Two-Piece Armoire from a reader. Though she hasn’t had a chance yet to build it (I know how that is!), she’s hoping to build it soon! In the meantime, I was contacted by Dave who also requested plans for a two-piece armoire but on a much larger scale. This bad boy is massive and will be so fabulous when completed! So, on to the free plans to build Dave’s Two-Piece Armoire…
Bird house plan - "The Tall Texan"
Free birdhouse plans - this plan is called the Tall Texan because of its height, and because its roof is painted similar to a Texas flag. Of course, you don't have to paint the roof at all. :-)
It can be built from a single 6 foot 1" x 4" fence board. My projects are all built from usedfence boards. If you do the same, the material is free. The only cost was the galvanized air nails that I used to fasten the pieces together, and the wire I used to hang it.
It can be built from a single 6 foot 1" x 4" fence board. My projects are all built from usedfence boards. If you do the same, the material is free. The only cost was the galvanized air nails that I used to fasten the pieces together, and the wire I used to hang it.
Using the diagrams below as a guide, you can get an idea of how the pieces fit together. The two side pieces are 8" in length. The two end pieces are 10" in length. The angle of the roof is 45 degrees. To cut the end pieces, measure 8" from both sides and cut a 45 degree angle on each side to form the roof slope. Attach the two end pieces to the two side pieces keeping the bottoms flush, as shown below.
 |
| Birdhouse Exploded View |
Nail the bottom piece and roof pieces together and attach them as shown in the diagram below.
 |
| Side View and Front View Free Birdhouse Plans |
Wooden chair
You can decorate the wooden chair for fall, as shown in the picture above. Or in the off season, you can also use it as a decorative patio chair or plant stand.
Building the wooden chair
 |
| Wooden Chair - assembled |
This chair was assembled using a combination of 1.25" and 2" staples, but you can use finish nails or screws as you see fit.
Note that this chair is not designed to be used for sitting. It is strictly for decorative purposes.
The back is made of three, 1 inch by 4 inch (1x4), fence boards. The two outer boards are 28 inches long. The center one is 20 inches long.
The three boards are held together by a 1x2 11.5 inches long on the back (placed 20" above the bottom), and a 1x4 9.5 inches long, on the front (placed 10" above the bottom and centered between the three boards).
The middle back board is positioned 2" above the two side boards, making the total chair height 30" high. See the diagram below.
 |
| Wooden Chair - (exploded view) |
Use the diagram above as a reference to cut and assemble the remaining chair pieces. Have fun building this decorative chair.
ref: http://www.mycarpentry.com/fall-craft-projects.html
Subscribe to:
Posts (Atom)