Q:
I made a jig that needed threaded inserts but I had one heck of a time installing them by hand. They went in cockeyed and I trashed their slots.What am I doing wrong?
A:
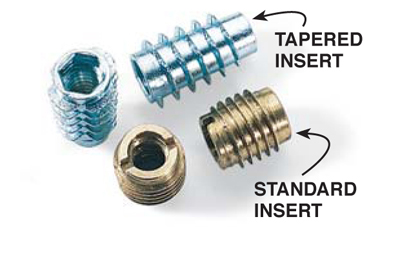
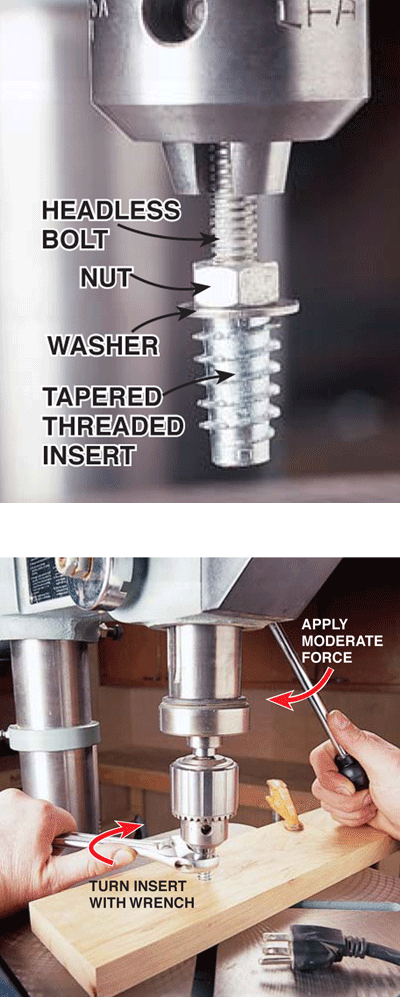
The most common kind of threaded insert is the straight brass barrel with thin outside threads and a single slot. A better one has wide threads, a hex wrench slot and is tapered to guide into the hole straighter. The most foolproof way to install both threaded inserts is to use an unplugged drill press and a bolt to support the insert. The drill press keeps the insert square to your board.
Here’s how to install them:
 1. Drill a hole of the recommended size (see package) into your piece of wood.
2.Unplug your drill press.
3. Cut off the head of a bolt with the same thread as the insert and grip it in your chuck.
4. Spin a nut, washer and insert onto the bolt.Turn the insert and the nut together, as tight as you can, by hand.
5.Center the hole directly under the insert and clamp the piece down to the drill press table. Advance the insert into the hole until it just contacts.Turn the chuck slowly,by hand, to advance the insert into the wood. Keep turning the chuck until the insert is fully engaged.
6. Back off the nut using a wrench. Reverse the spin of the chuck.The bolt will spin right out.The top of the inset may be a bit proud of the face. You can drive it below with a hex wrench or use a fine file to level it off.
If you don’t have a drill press, don’t worry, you can turn the inserts in by hand. Getting them started is the hard part, so be sure to use the tapered style insert.Drive in the insert using a hex wrench.Check with a small square to make sure it’s going in straight.
ref: http://www.popularwoodworking.com/techniques/q-installing-threaded-inserts
No comments:
Post a Comment