Required Steps for this Project
- Step 1: You can build it in two days with simple tools
- Step 2: Make precision plywood cuts with a simple jig
- Step 3: An old clothes iron works best to apply the edge banding
- Step 4: Measure three or even four times when drilling holes for the fasteners!
- Step 5: Drill the recessed holes for the tubing and then drill the holes for the threaded rod
- Step 6: Assemble the plywood panels, then insert the tubing and threaded rods
- Step 7: Apply two coats of urethane for a cola-resistant finish!
Step 1: You can build it in two days with simple tools
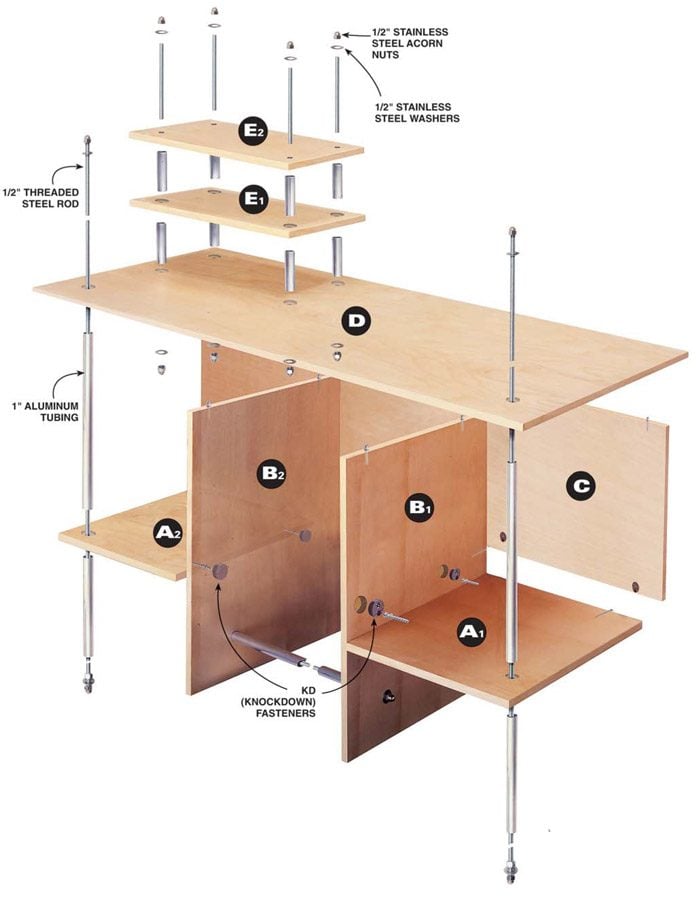
I designed this desk so it wouldn't require a lot of carpentry experience to build. Take a close look at Fig. A. You just cut eight panels from 3/4-in. birch plywood and apply some easy-to-use iron-on edge banding. The rest of the project consists of drilling holes, cutting the pieces and assembling them with special fasteners. You'll be done in a weekend and still have time to apply the first coat of finish.
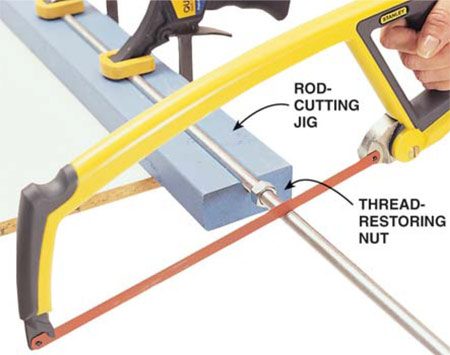
To do this project, you'll need only basic power and hand tools: a circular saw, hacksaw, drill, screwdriver, hammer, tubing cutter (Photo 9), utility knife, some wrenches and an old clothes iron. The thin-veneer edge banding that covers the exposed edges of the plywood can be trimmed carefully with a sharp utility knife, but I'd recommend splurging on a double-edge trimmer (Photo 4). Once you see how quickly it trims the edge banding, you'll be hooked.
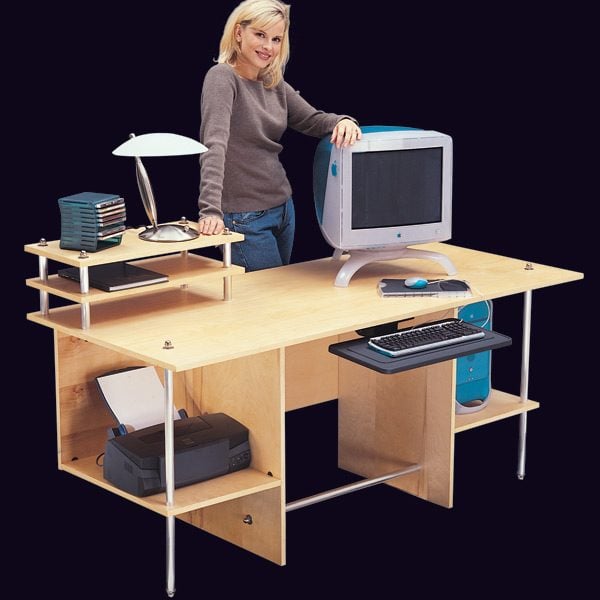
Here's what this desk can offer you:
- Lower shelves on both sides to hold your computer's processor and printer as well as your stash of reference books
- Two upper shelves handy for keeping track of paperwork, setting up a reading lamp or storing CDs.
- Large workspace with enough length for three chairs; now you can have your favorite Internet tutors or game partners right at your side.
- Extra 2-1/4 in. space behind the back panel to hide the cord clutter of phone lines, printer cables and surge protector outlet strips.
- Pull-out keyboard tray that'll conveniently adjust up and down or to any angle.
- Special knockdown fasteners to make it fast and easy to put together and take apart, a real asset on moving day or on those back-and-forth trips to college.
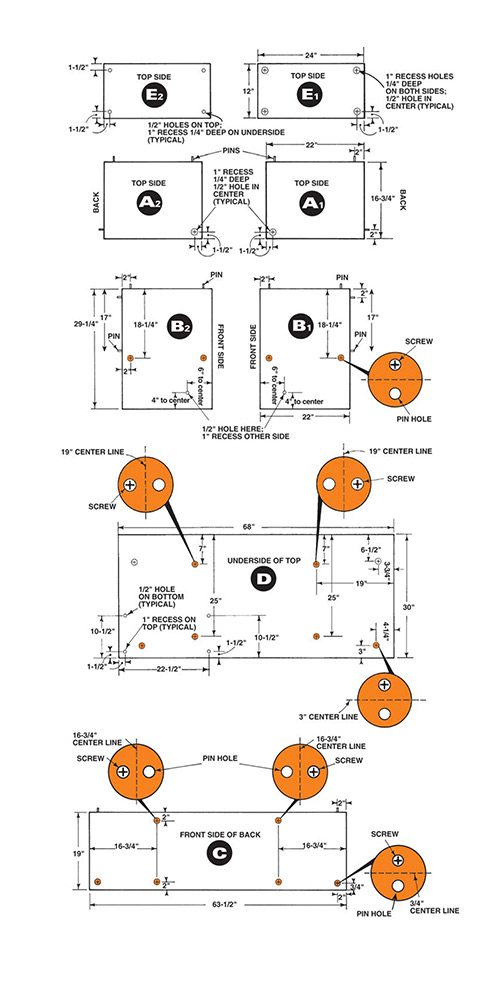
Figure A: Cutting List
Birch plywood is a good choice for this desk. It's stable and the fine wood grain complements the aluminum tubing and the stainless steel nuts and washers.
Additional Information below for a complete Cutting List.

Step 2: Make precision plywood cuts with a simple jig

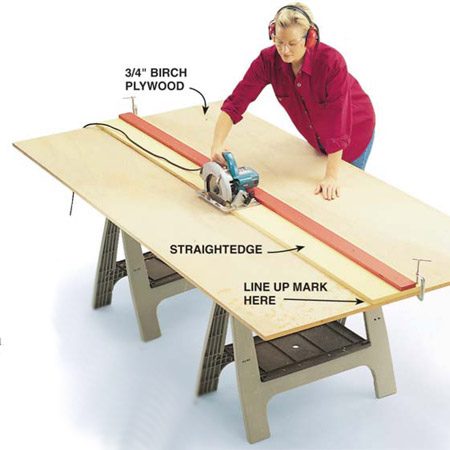
Cut the plywood pieces as “exact” as you can. To make it easy, build a simple jig like the one shown in Photo 1 using two strips of plywood. If you don't feel confident of your cutting ability, go to a full-service lumberyard and ask to have it cut for you, usually for a small fee. Just insist that they use a fine blade in their panel saw so your crosscuts (the cuts opposite the grain) don't splinter the surface veneer. Offer to buy them a new plywood-cutting blade if you don’t like the look of the first cut.
Accurate cuts are the key to making sure the panels all fit precisely with the special knockdown fasteners. I've found that the fastener will still work if you’re off the mark by 1/16 in., but any more than that spells trouble.
Step 3: An old clothes iron works best to apply the edge banding

The simplest way to cover exposed plywood edges is to use adhesive-backed birch edge banding (get it at your home center). A hot clothes iron melts the adhesive and bonds it directly to the plywood. If the adhesive oozes out on the sides, it may ruin a good iron, so buy a secondhand unit from a thrift store. Before you start, cut the 7/8- or 13/16-in.-wide edge banding about 1/2 in. longer on each end than needed.
Preheat the iron on the cotton setting. Place the iron on top of the edge banding as shown in Photo 3. I moved my iron about 2 in. per second along the veneer, but you'll need to see what works best for you; if you go too slowly, you'll scorch the wood. Once you go from end to end, make a second ironing pass. The veneer should be hot to the touch. After the second pass, secure the veneer in place by pressing a 4-in. block of 2x4 back and forth along the entire length to ensure a good bond. If you notice a glue failure at any time before finishing, you can always go back and reheat it (or even replace a damaged strip).
Trim the edge banding once it cools. Put the veneer face down on a workbench and cut the ends flush with a utility knife. Then trim the edges as shown in Photo 4 with a utility blade or the special double-edge trimmer. Don't trim the overhanging edges of the banding all at once; do it in several passes. Don't try to trim too closely; you can clean up the edges with a sanding block and 150-grit sandpaper.
Step 4: Measure three or even four times when drilling holes for the fasteners!

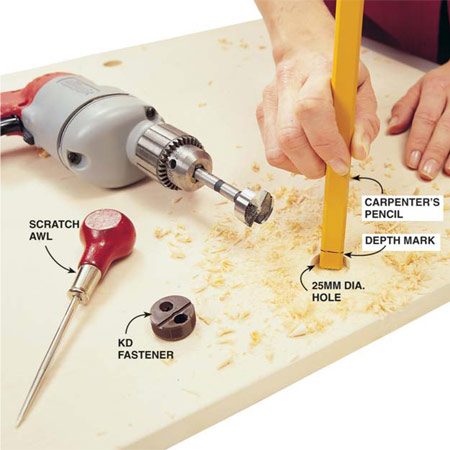
The knockdown fasteners have a main body that fits into a 25mm-dia. hole drilled into the plywood surface. The mating plywood panel has a pin that fits into a hole in the body of the fastener. To tighten these two panels together, a screw turns an internal cam in the fastener body that snugs the pin into the fastener body, similar to tightening a nut on a bolt. Exact placement is critical. Measure the locations as shown in Fig. B. Then be sure to tap them in the correct orientation.
The hole for the fastener body is about 9/16 in. deep, which leaves less than 3/16 in. of plywood at the bottom. This is touchy stuff; a hole driven too deeply can pop through the other side and ruin a panel. If you're worried about breaking through, mark the fastener height onto the side of a carpenter's pencil. That way you can check the depth as you drill by dropping the pencil in the hole as shown in Photo 5. I've never had the drill bit penetrate the plywood (yet). Just be careful, and you shouldn't have a problem either.
Figure B: Fastener Location Guide
Use this guide when drilling the holes for the knockdown fasteners and the aluminum tubes and threaded rods.
This guide is also available below in Additional Information.

Step 5: Drill the recessed holes for the tubing and then drill the holes for the threaded rod

Accurately mark the locations for the tubing and threaded rod as shown in Fig. B. Notice that the lower shelves, A1 and A2, as well as E1, have recessed holes on the top and bottom. In contrast, the top (D) and the upper shelf (E2) have recessed holes on one side only. Carefully visualize how the pieces fit together before drilling each one.
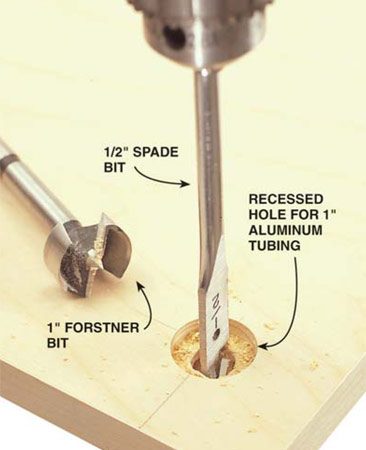
Now drill the recessed holes for the tubing and the holes for the rod (Photo 8) into the top (D) and small upper shelves (E1, E2). It’s worth your time here to make a heavy paper template to get the centers of all the holes exactly placed. This will ensure perfectly aligned shelves.
Be sure to mark your hole locations and then use an awl (Photo 5) to push a small starter hole into the surface. This shallow starter hole will help you align the small spur on the bottom of the Forstner drill bit.
Step 6: Assemble the plywood panels, then insert the tubing and threaded rods

The two lower shelves (A1 and A2) must be attached to the two upright panels (B1 and B2) first. Insert the pins of the fasteners into the holes and turn the screws until they're tight. Next, attach these two assemblies to the back (C). To complete the desk frame, lay the top upside down on the floor (a carpeted area works best) and attach the top in the same manner.
Now, insert the long tubes between the top and the lower shelf (Photo 12). You need to push the top and the lower shelf apart slightly to fit the tube into the recesses. Next, thread a standard nut onto the bottom of each of the long rods and push the rod through the lower leg tube and then through the upper long tube. You'll have to fuss with the rod a bit to get it to come through the top. Finally, slide the washers onto each end and thread on the acorn nuts. Make sure the tubing is still in the recessed holes. Tighten the nuts firmly without crushing the wood. (This is a desk, not a pickup truck frame.)
Finally, attach the upper shelves, E1 and E2, to the desktop. Fit the tubes into the recesses and fish the rod through the tubes and holes in the shelves. Slide the washers in place and thread the nuts onto the ends of the rods.
Step 7: Apply two coats of urethane for a cola-resistant finish!
I used an oil-based polyurethane for a tough finish that'll enhance and slightly darken the birch into a beautiful warm color. If you prefer a clear coating, choose a water-based finish.
Take your desk apart and sand all the surfaces with 220-grit sandpaper. Wipe the surfaces with a regular cloth and then a tack cloth to remove all the dust. Brush on the urethane, watching for any drips and smoothing them out with your brush as they appear.
The next day, lightly sand the entire surface with 220-grit sandpaper to remove any bumps or trapped dust. Wipe with a tack cloth and apply your second coat. Let it dry for two days before assembling your desk.
ref: http://www.familyhandyman.com/woodworking/projects/simple-modern-computer-desk/step-by-step
No comments:
Post a Comment